
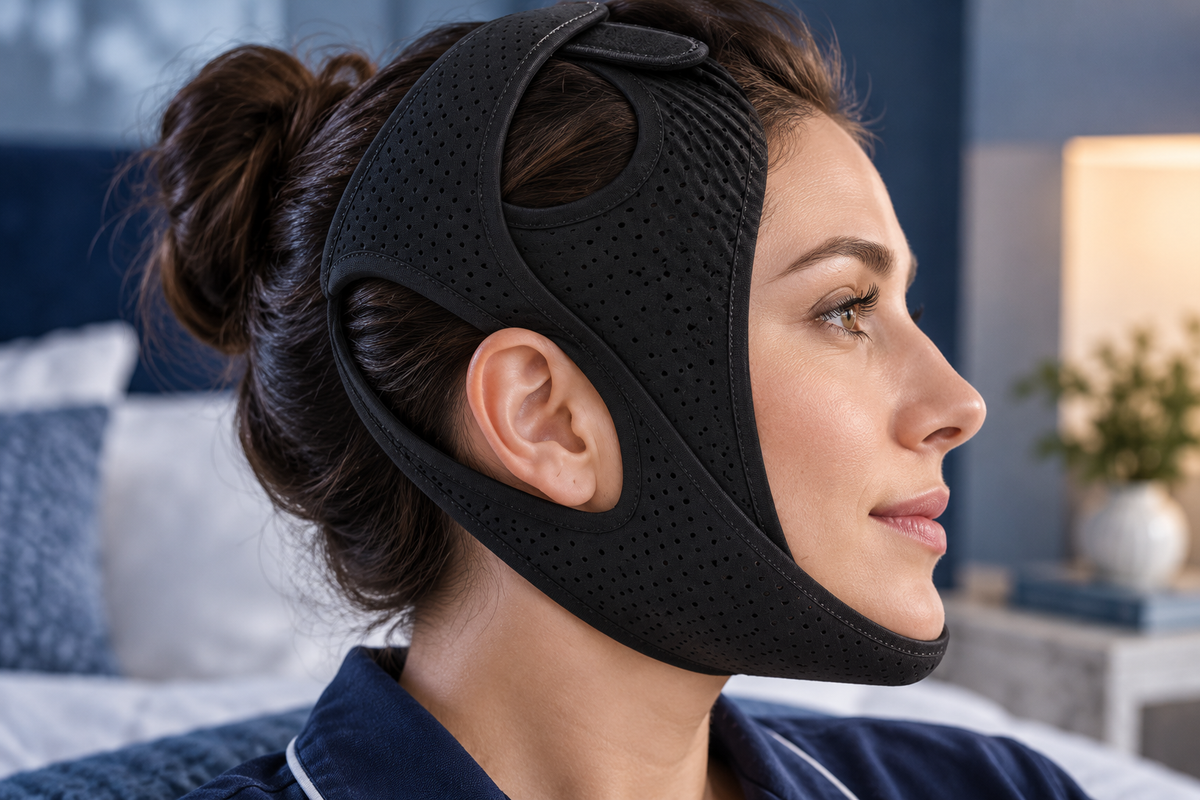
RestHaven's oval ear openings are an important part of its shape. During fitting, check that the fabric sits around each ear comfortably instead of pulling the ear into a position that feels unnatural.
Align before fastening
Open the crown fastening and place the chin cradle according to the supplied instructions. Bring the side panels into position gently. Use a mirror to check both sides, since a comfortable placement on one side does not automatically mean the other side is aligned.
If an ear is folded under an edge, reopen the fastening and reposition the panel. Do not pull hard on the opening while the strap is under tension. Starting again with relaxed fabric gives you a clearer view of the intended shape.
Notice small obstructions
Hair caught beneath the closure or a folded fabric edge may make the fit feel uneven. Move loose hair away before closing the fastening. If you wear earrings or other accessories, consider whether they interfere with the fabric and follow any relevant advice for those items.
Check the opening again after a small adjustment. The goal is straightforward placement, not a perfectly symmetrical photograph. Comfort and an unobstructed nose and mouth matter more than how the strap looks on camera.
Do not force an opening to fit
Remove the strap if an ear remains pinched or sore. Avoid cutting or enlarging the openings yourself, which changes the product and can leave rough edges.
Contact RestHaven with a description of the problem. Support can clarify product details and the trial return process if the shape does not suit your fit.
Check both ear openings before judging the setup
Imagine that the right side looks straightforward in the mirror while the left ear feels pulled. A single comfortable side does not establish the whole fit. Release the closure and inspect the left panel with the product relaxed so that you can see whether the opening is aligned or the edge has folded.
Reset the strap following the supplied instructions. Move loose hair away from the closure and notice any other personal accessories that could interfere with the fabric. Do not pull hard on an opening while the strap is fastened; that can move several parts at once and make the actual issue harder to identify.
The aim is not a perfectly symmetrical photograph. Human proportions differ, and visual symmetry alone cannot tell you whether a wearable item is comfortable. Check the position and your own sensation together, with the nose and lips uncovered throughout the fitting.
Should you alter an opening that feels too small?
No. Cutting or enlarging the fabric changes the product and may leave an edge that behaves differently. If the shape does not suit you, ask about it or use the trial return route. The product should be assessed as supplied rather than rebuilt to preserve the purchase.
How can a partner help appropriately?
A partner can describe a visible fold or help you compare the position with the instructions. The wearer should control the adjustment and decide whether it feels suitable. Someone else's view that the opening looks fine does not override discomfort. Keep the help specific and optional, and stop the fitting if an ear remains pinched, sore, or uncomfortable after following the directions.
Prepare a fitting space that makes the details visible
Set the strap on a clear surface beside the instructions supplied with your item. Good lighting is more useful than a complicated setup. You want to see the edges, the openings, and the fastening without turning the first fitting into an event that needs special equipment or a second person.
Start with the product open and relaxed. Follow the fabric from the broad cradle toward each ear opening and then to the crown. If a side panel is folded inside out or crossed over another part, correct the orientation before bringing it to your face. It is easier to understand the shape when nothing is under tension.
Keep anything that might catch in the fastening away from the work area. Loose hair, delicate clothing, and nearby fabric can distract from the fit check. You do not need to change your appearance or buy extra accessories; the aim is simply to notice what is part of the strap and what may be interfering with it.
If the item appears different from the listing, is damaged, or arrives without usable instructions, contact the team before using it. A website photograph is a helpful reference, but it does not replace the directions for the actual item. You can ask a precise question without improvising a fitting method.
Distinguish placement from tension
Placement describes where the product sits. Tension describes how firmly it is fastened. They interact, but they are not the same problem. An ear opening that is out of position may need the strap to be reopened and reset; simply tightening the crown can make the misplaced edge feel worse.
Check the broad chin cradle first, following the supplied directions. Then look at both side panels and the ear openings before assessing the closure. Taking the whole arrangement in sequence is clearer than repeatedly pulling on whichever part first draws your attention.
Use small, deliberate changes. After making one adjustment, check the rest of the fit again. If the fabric has twisted, release it and straighten the arrangement while it is off. Avoid dragging a tightly fastened edge across your face to chase the position shown in a product photograph.
The product should not be treated as something to tighten as far as possible. Support is not a contest of pressure, and the fastening's remaining overlap is not a score. If you cannot find a suitable setup without discomfort, stop and ask for clarification or use the return process.
Make the first check while fully awake
Choose a moment when you can pay attention to the product and remove it easily. The first fitting is for understanding the shape and feel, not for proving that you can tolerate an unfamiliar sensation for a long period. There is no reason to rush straight from opening the parcel to overnight use.
Keep the nose and lips uncovered. Notice whether an edge has rolled inward, whether an ear is being pulled, and whether the chin cradle is where the instructions intend it to sit. A front view and a side view can reveal different details, so do not rely on a single glance.
If you experience pain, irritation, difficulty breathing, or persistent uncomfortable pressure, remove the strap. Do not interpret discomfort as a necessary stage of making the product work. A product trial is a chance to assess suitability; it is not an obligation to continue through a problem.
For medical suitability, questions about a breathing condition, or use alongside prescribed equipment, consult the appropriate clinician. Customer support can clarify the product and its instructions, but a retail conversation cannot establish an individual medical recommendation.
Use a mirror or a partner without losing control of the fit
A mirror is useful for spotting a twist or a trapped strand of hair. It cannot tell you how much pressure you feel. Compare what you see with what you notice physically, and let your own comfort remain part of the decision rather than judging the fit entirely by appearance.
If a partner helps, ask for a description before an adjustment. A sentence such as the left edge looks folded gives you information you can act on. Someone reaching over and tightening the strap without warning gives you less control and can make it harder to understand what changed.
The wearer should decide whether to continue, remove the product, or ask a question. A partner may have useful observations, but their view that the strap looks comfortable does not override the wearer's experience. Keep the fitting cooperative and unhurried.
You do not need to take a personal photograph for an initial check. If you later choose to send an image to support, frame it around the specific product question and avoid including unrelated people or private details in the background. A written description is often enough to begin the conversation.
Understand the limits of the size listing
RestHaven's listing includes a 56 cm measurement. Before comparing that number with a measurement of your head, establish what the listing measures. A product length and a recommended body measurement are different types of information, even when both use centimeters.
Ask support which part of the product the number describes and whether a fit range is provided for your intended comparison. Do not create your own size chart from the model's face or assume that an adjustable closure makes the number irrelevant.
The shape matters alongside any measurement. Ear position, hair, facial proportions, and the way the fabric lies can affect whether a design suits a particular person. Two adults may find different settings comfortable, and a shared purchase does not create a shared fit requirement.
If uncertainty remains, waiting for clarification is a sensible choice. Ordering several straps does not resolve an unclear measurement. Begin with the information you need, then choose the number of items that serves your actual routine.
Keep useful notes without overcomplicating the evening
A short note can help if the same question comes up again. Record the part you were checking, what you changed, and what you noticed afterward. Keep the description practical: an edge remained folded, an opening seemed out of position, or you could not identify the intended fastening overlap.
Change one aspect at a time when following the instructions. If you reposition every part at once, it becomes harder to explain which change helped or which problem remained. You are not conducting a medical experiment; you are making a simple record of a product setup.
Do not use a diary to pressure yourself into continuing with discomfort. A clear note that the fit was unsuitable is as useful as a note that you found the fastening manageable. The goal is a decision you feel comfortable with, not a perfect chart.
Store the note with your order confirmation and product instructions if that is convenient. Keeping those details together can save time when asking support a question. It also helps you find the delivery date if you decide to request a return during the trial.
Ask a question the team can answer clearly
Email support@shopresthaven.com with a focused subject and the order number if you have already purchased. Identify the part of the strap involved. Describe whether the issue concerns the instructions, the visible construction, a measurement, or something that happened during the awake fit check.
Mention the adjustment you already tried, but avoid sending a long sequence of guesses. A concise account of the current issue is easier to understand than several messages that use different words for the same part. If the team asks for clarification, continue in the same conversation.
Do not send passwords, card security codes, or full payment numbers. Those details are unnecessary for a fitting question. Medical concerns belong with a qualified professional, and you do not need to disclose a detailed health history to ask how the crown closure is meant to align.
Support can explain available product information and the return route. It should not be used as a reason to ignore discomfort or to modify the product yourself. Avoid cutting, sewing, or adding another fastening to force a design that does not suit you.
Use the trial as a genuine decision period
RestHaven offers a 30 night trial, with a free return request available within 30 days of delivery. Normal trial use does not by itself make the purchase ineligible. Read the returns page before you need it so that the process is familiar.
If you decide to return, email the team with your order number, checkout email, and the item or pack involved. After verification, the team sends a prepaid return label or carrier barcode and instructions. Wait for those details instead of choosing a return address yourself.
For a complete pack return, include all straps from that pack. For a partial pack return, ask the team to confirm the items and refund amount first. Keep the carrier drop off receipt and tracking reference so that the parcel can be followed through the return process.
The team checks the parcel after it is received and issues the refund for the returned items to the original payment method. Your provider may take additional time to show the credit. The trial gives you room to decide whether this particular design belongs in your routine, including deciding that it does not.
Put the information to work
Choose the one question from this guide that matters most to your situation and write down the next action it calls for. That might mean checking the supplied instructions, reviewing an order detail, asking the team a specific question, or deciding that you need more information before purchasing. You do not need to complete every possible step at once.
Keep the relevant product information and any support reply together so you can find them when needed. Use the current RestHaven product page for the available pack options and prices, and the returns page for the 30 night trial process. The team can be reached at support@shopresthaven.com.
For a related practical question, continue with How to Adjust the Crown Fastening. Each guide can be read independently; use the contents links to return to the section that answers your immediate question.